Guten Morgen meine Lieben,
wie ihr vielleicht mitbekommen habt, fing für mich am Montag der Schulalltag an. Das ist auch der Grund, warum ihr so lange nichts von mir gehört habt. Bestimmt könnt ihr euch vorstellen, dass in der 1. Schulwoche viele Termine anstehen und Organisatorisches zu erledigen ist. Ständig habe ich den Gedanken: „…Rosy, hoffentlich hast du nichts vergessen. Denk noch einmal nach…“ ;D
Aber es wird von Tag zu Tag besser und die Kleinen und ich können so langsam richtig durchstarten!

Apropros Schule + die Kleinen… Ich darf auch dieses Mal wieder Kunstunterricht geben. Und jetzt denken sich viele wahrscheinlich: „…Oh, wie toll! Rosy ist so kreativ. Bei ihr macht Kunst bestimmt ganz viel Spaß!!…“ Manchmal ist es eine ganz schöne Bürde, wenn jemand aus dem Umkreis weiß, dass du Kreativ-Bloggerin bist. Die Erwartungen sind meist hoch und du versuchst dem gerecht zu werden. Zum Glück konnte ich bis jetzt sowohl Kollegen als auch Kinder immer von meinen Ideen begeistern 🙂 So auch von diesem Projekt!

Und damit sind wir schon beim heutigen DIY-Thema! Wie ihr auf den Bildern unschwer erkennen könnt, habe ich 3D Wolken aus Tonpapier gebastelt. Wolken-Liebe und so ☁️ *-*
Eigentlich sind die Wolken nur ein Teil eines gesamten Kunstwerkes. Sie ergänzen das Ganze. Aber weil es sonst zu viel Anleitung wäre – hab ich 2 Beiträge daraus gemacht. Denn immerhin bekommt ihr in diesem Blogpost schon 2 Anleitungen. Ich zeige euch nämlich 2 verschiedene Arten von Wolken, die ihr nachbasteln könnt. Einmal die symmetrische und einmal die unsymmetrische.

Bevor wir uns den Step-by-Step-Schritten widmen, muss ich euch noch auf etwas hinweisen. Ihr wisst ja, dass aufm Blog meist alles schön und hübsch aussieht! Alles ist so toll drapiert und hach und ohh – aber dass es in der Realität hinter den Kulissen weniger der Fall ist 😀
Meine 12 von 12 Beiträge sind der beste Beweis dafür, dass wir nicht in einem Heim wohnen, das einer dieser Kataloge gleicht. Oder die ganze Zeit mit einen weißem Zahnpasta-Grinsen durch die Gegend laufen, wie die perfekte Familie aus dem Fernseher ;D
Was ich dieses Mal für das Shooting gemacht habe, findet ihr weiter unten in einem Behind the Scene Bild 😉

Ich habe nämlich 2 hellblaue Tonkartons aneinander gereiht. Das Ganze hinten mit Paketklebeband an die Mauer unseres Balkons befestigt. Mit der Hoffnung: Solange ich shoote, bleibt ihr bitte an der Wand. Danach könnt ihr gerne abfallen. Aber nicht in der nächsten halben Stunde, höhö ;D
Jetzt hatte ich das Problem mit dem Übergang. Man sieht, dass das Konstrukt in der Mitte unterbrochen wird. Dass es aus 2 Blättern Tonkarton besteht. Jetzt kommt meine Beichte: Ich habe das erste Mal für den Blog retuschiert 😱 Ja, ist das zu fassen! Mensch Rosy…

Wenn man genau hinschaut, sieht man die Stellen auch. Aber im ersten Moment fällt das gar nicht so schnell auf, oder? 😀 Dennoch wird es etwas sein, was ich in Zukunft nur in Notfällen einsetze… Kostet mich einfach zu viel Zeit da rumzuwischen und -stempeln.
Übrigens: Die Technik für diese Wolken kennt ihr bereits von mir. Denn im letzten Jahr habe ich sie schon 2x benutzt. Die Eistüten habe ich sogar mit Jahrgang 4 damals gebastelt und das klappte außerordentlich gut! Sie brachten sogar eigene Ideen mit ein und haben wirklich tolle Eistütchen gebastelt und gestaltet *-*

Das andere DIY waren die Papier Kürbisse 🙂 Da gab es sogar einen extra Auftrag von einer Instagram-Bekannten, weil sie ihr sooo gut gefallen haben, hihi! Hach, wie hab ich mich gefreut 🙂 Die sehen auch einfach stylisch aus! Ja, ich weiß, ich weiß. Eigenlob stinkt. Aber hey, die sind wirklich toll, oder? ;D
Heute also wieder diese Technik – nur mit Wolken 😉 Seid ihr bereit? Dann lasst uns loslegen!

Du brauchst:
Tonpapier [*]
Vorlage [hier]
Bleistift
Klebestift [*]
Schere
Korkunterlage
Garn / Strick
Nadel / Prickel [*]
Symmetrische Wolke


-
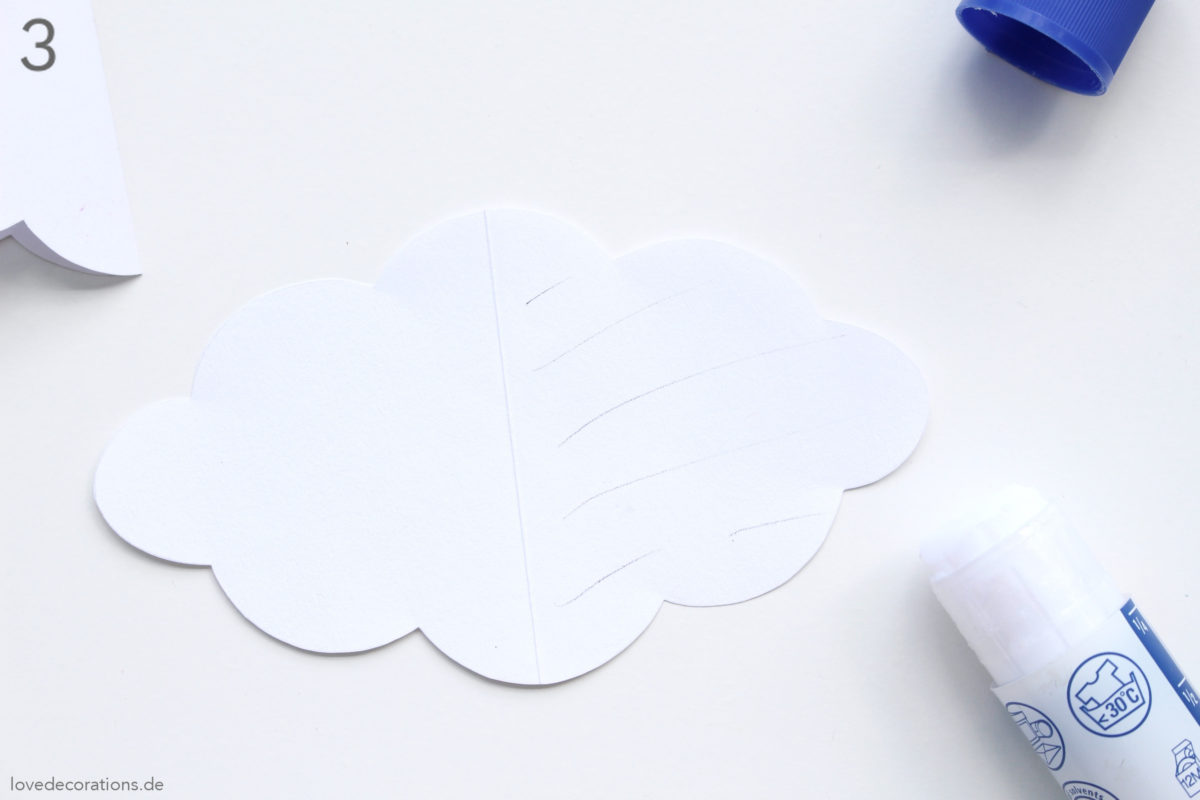
- Schablone auf Tonpapier übertragen und ausschneiden
- evt. Bleistiftlinien am Rand vorsichtig wegradieren
- Schablone auf Tonpapier übertragen und ausschneiden
-
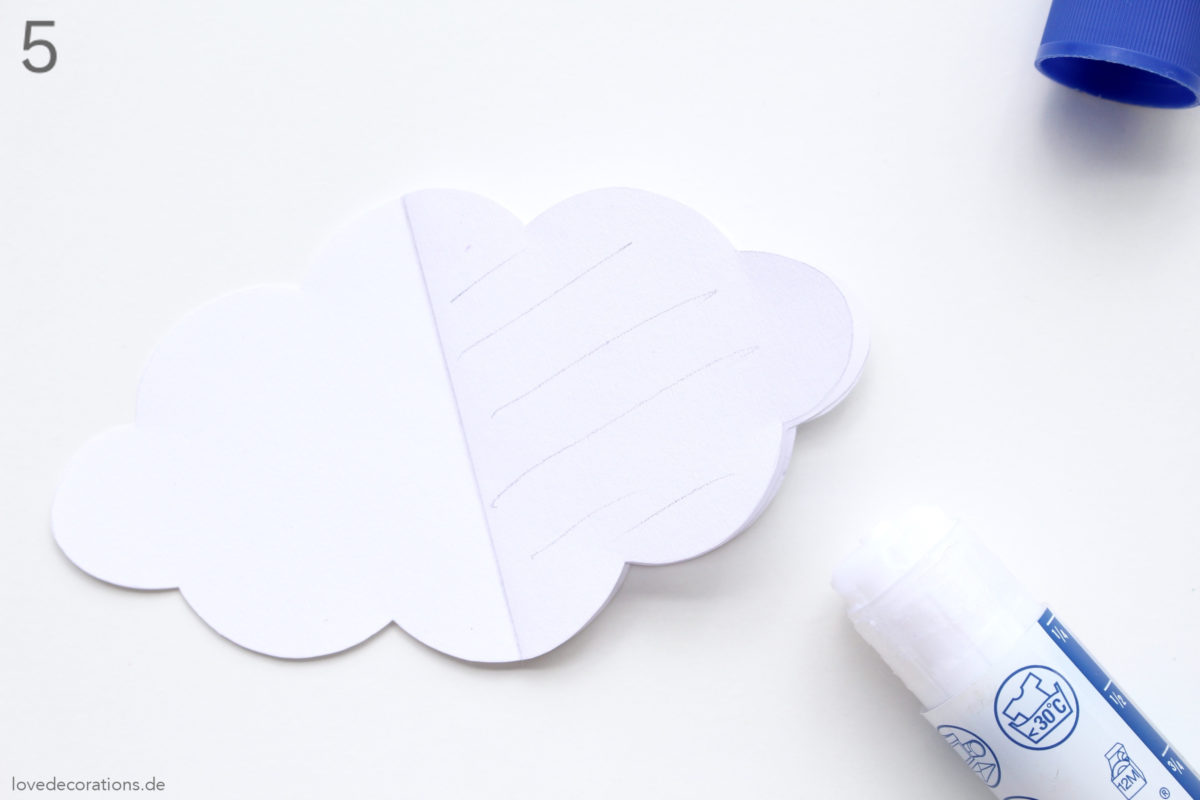
- einmal in der Mitte falten
- wiederhole diesen Schritt mit allen Wolken
- Kanten ordentlich glatt streichen

-
- klappe die Wolke wieder auf und trage auf die rechte Hälfte (hier schraffiert) Kleber auf
-
- nimm dir eine andere Wolke und setze sie auf diese Hälfte

-
- klappe die neue Wolke rechts runter und trage wieder auf die rechte Hälfte Kleber auf
-
- nimm dir wieder eine neue Wolke und wiederhole Schritt 4


-
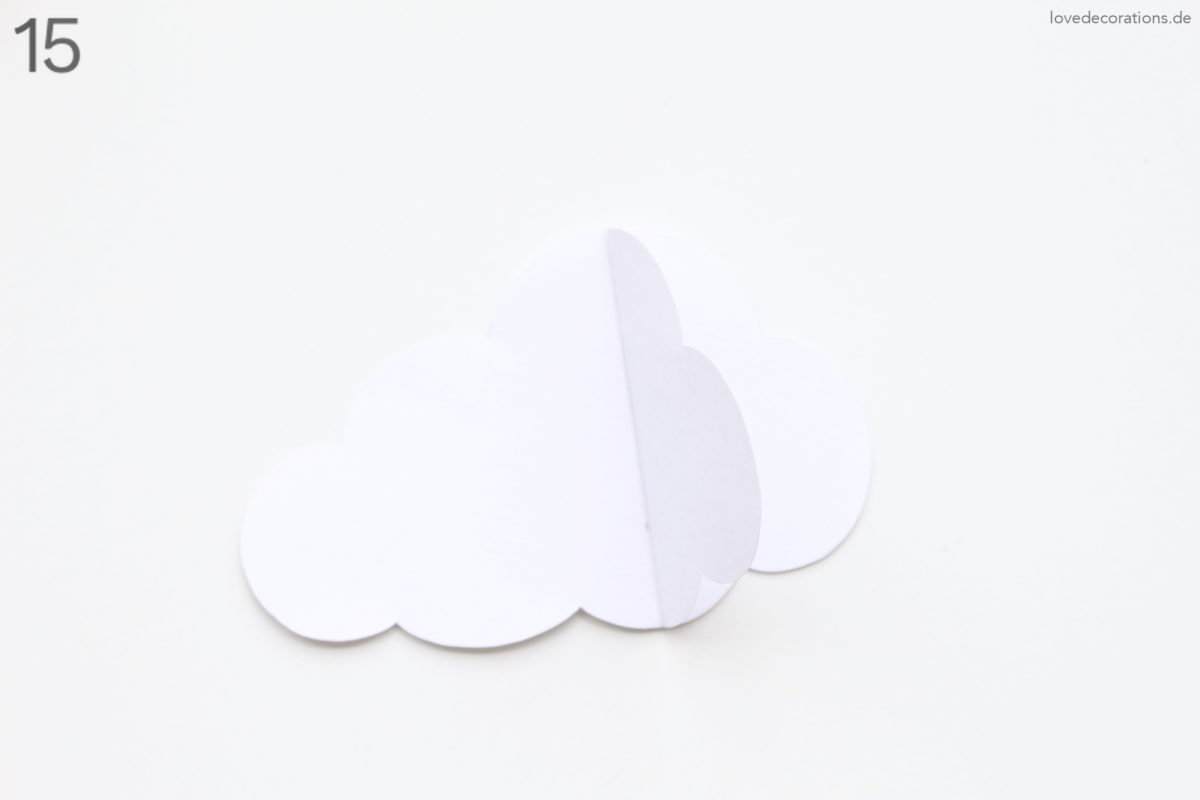
- nun trägst du auf die rechte und linke Hälfte Kleber auf und klebst die beiden Hälften zusammen
-
- wenn du das Ganze auffächerst, sollte es von oben so aussehen


-
- falte die fertige Wolke flach vor dir auf und lege die Korkplatte drunter
- mit deinem Prickel / deiner Nadel stichst du oben ca. 5 mm vom Rand in der Mitte ein Loch
-
- stecke anschließend den Faden durch das Loch und knote es am Ende zu
Unsymmetrische Wolke


-
- Schablone auf Tonpapier übertragen und ausschneiden
-
- die beiden unsymmetrischen Wolken so knicken, dass der erste große Bogen symmetrisch in der Mitte gefaltet wird


-
- der symmetrische Teil der Wolke einfach in der Mitte falten
-
- nimm dir eine unsymmetrische Wolke und trage auf die rechte Hälfte Kleber auf

-
- und bringe den symmetrischen Teil der Wolke hinten an
- trage auf beide Hälften Kleber auf und klebe die andere unsymmetrische Wolke oben drauf
-
- so sollte es von oben aussehen


-
- lege dir die Korkplatte unter die Wolke und steche ca. 5 mm unter dem Rand ein Loch
-
- zum Schluss Faden durch das Loch ziehen und zuknoten

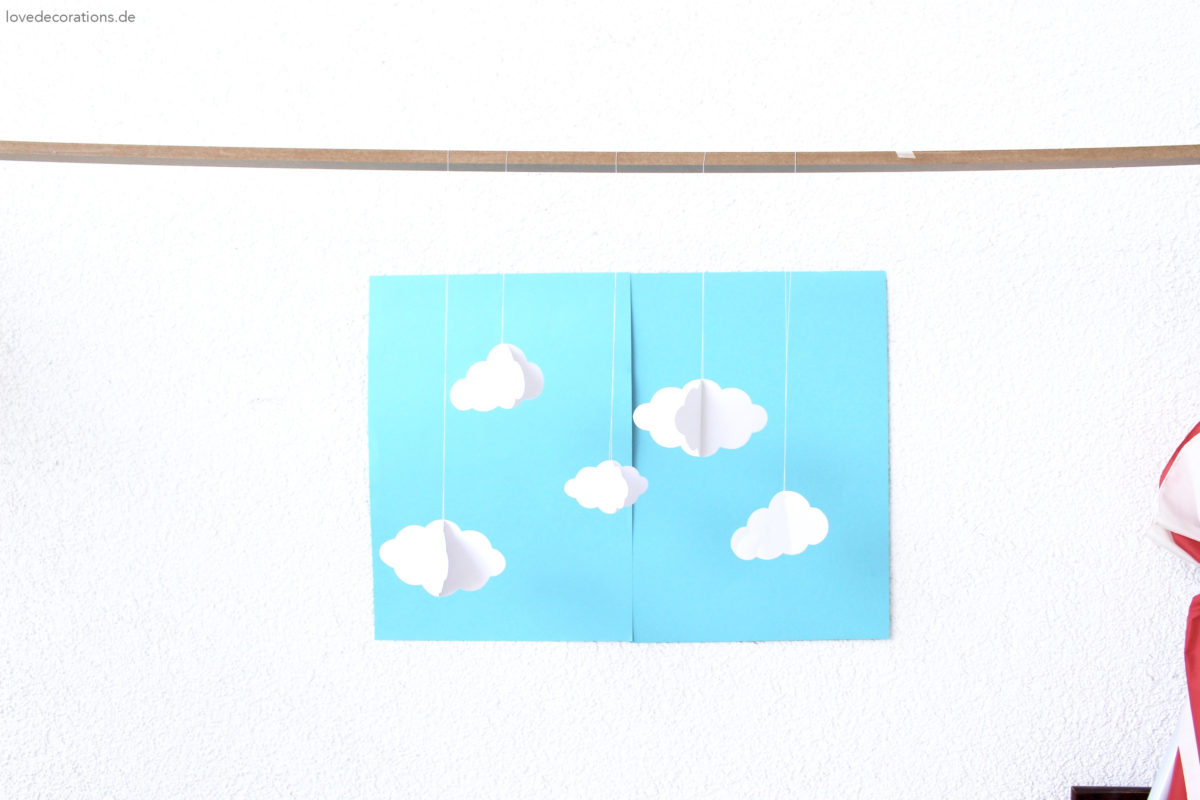
Flieg Wölkchen, fliiiieg 😀 Sind die nicht niedlich? *-* Eignen sich bestimmt auch als Mobile oder so. Wie bereits weiter oben erwähnt, sind die bei mir nur ein Teil eines gesamten Werkes! Wofür ich sie verwende bzw. wozu sie gehören, erfahrt ihr im nächsten Blogbeitrag 😉
Mit den Kindern in der Schule bin ich ebenfalls dabei dieses Projekt umzusetzen. Die ersten Wolken sind bereits fertig. Bin gespannt, wenn alles geschafft ist, ob es so wird, wie ich es mir vorstelle 🙂
Und hier das versprochene Behind the Scene Bild, höhö 😀 Es hat wirklich erstaunlich gut an der Balkonmauer gehalten. Die eine Seite der Latte konnte ich auf das Geländer des Balkons absetzen und die andere aufm Wäscheständer. Das Schwierige beim Shooting war – im richtigen Moment abzudrücken bzw. ihn zu erwischen. Da es leicht windete und die Wolken sich permanent drehten 😀
Da seht ihr übrigens auch, dass der Hintergrund aus 2 Tonkartons bestehen und die doofe Mitte, die ich wegretuschiert habe!

Damit sind wir am Ende des heutigen Beitrags. Ich hoffe, ihr verlebt jetzt alle noch einen famosen Sonntag und fühlt euch alle lieb geherzt ❤️
 Froh und Kreativ – Ein kleiner Blog
Link you stuff – Meertje
Summertime – Decorize
Die Links mit [*] sind Affiliate-Links. Ich bekomme ein paar Cent Provision, wenn du etwas kaufst. Für dich entstehen keine Zusatzkosten.


 66 Kommentare
Hi Rosy,
Die Wölkchen sehen echt hinreißend aus! 😍 Awwww…mit Wölkchen und Regenbogen kriegt man mich sowieso immer😁.
Der Aufwand hat sich auf jeden Fall gelohnt, die Bilder sind echt gut geworden! Mich überrascht es immer wieder…du machst so viel für deinen Blog! Du schreibst regelmäßig Blogposts, schießt Bilder, antwortest auf jeden Kommentar…das ist echt bewundernswert! Vielen Dank!
Ich wünsche dir eine schöne Woche!
Ganz viele liebe Grüße,
Hannah
Na ja, so regelmäßig bin ich nicht mehr unterwegs – wie es mal war *räusper* 🙈 Und auf die Kommentare antworte ich leider auch nicht mehr so zeitig, wie ich es gerne hätte – aber irgendwann hole ich sie nach. So wie jetzt, wie du wahrscheinlich merken wirst 😉 Dauert vielleicht nur etwas 🙆
Aber ich weiß es sehr zu schätzen, dass du immer wieder zurück kommst und dir sogar Zeit nimmst, mir solchen wundervolle Worte zu hinterlassen ♥
Dicker Kuss zu dir :*
Hervorragender Beitrag und einen wirklich schönen Blog hast du hier! Ich werde sicherlich öfter mal vorbeischauen! 🙂
Danke dir! Ein tolles Wochenende dir noch 🙂
Liebe Grüße,
Rosy
Come on, hurry up and join our game DAUNTOTO and get the main prize of cash and a Kawasaki ZX motorbike https://trustnlinepharmacy.us/
This DIY 3D clouds idea is so creative and surprisingly simple to follow. I appreciate how you broke down the process—it makes the project feel approachable even for beginners. I’ve been exploring hands-on projects lately, and while reading this, I also came across https://carxstreetsmodapk.com/
, which inspired some creative themes for my workspace decor. Thanks for sharing such a fun guide!
Really enjoyed this DIY guide! The way you simplified the 3D cloud-making process makes it easy even for beginners. I’ve been exploring creative projects lately, and this one fits perfectly. While reading, I also came across some helpful inspiration sources like https://bitlifeapkmods.com/
that keep me experimenting with new ideas.
Really loved the creativity behind this DIY 3D clouds idea — the simplicity mixed with visual impact is impressive. Projects like this always spark inspiration for me when personalizing spaces. I recently explored Torrentio as well, and it reminded me how both hands-on creativity and digital tools can enhance experiences in different ways: https://gettorrentio.com/
.
Really enjoyed this post! The DIY 3D cloud idea is such a fun way to add creativity to any room, and the cheat method makes it even more beginner-friendly. Projects like this remind me how small tweaks can elevate simple concepts — the same way tools like Bloxstrap help streamline experiences in other creative spaces. https://bloxstrappc.com/
Really enjoyed this DIY 3D clouds idea—especially the little “cheat,” which makes the whole process much more approachable for beginners. It’s a great reminder that simple shortcuts can save time without hurting creativity. I’ve seen the same principle apply in other spaces too, like finding a smooth https://3pattiblues.pk/ experience where ease of access really matters. Thanks for sharing such a practical and inspiring tip!
Really enjoyed this DIY 3D clouds idea—especially the little “cheat,” which makes the whole process much more approachable for beginners. It’s a great reminder that simple shortcuts can save time without hurting creativity. I’ve seen the same principle apply in other spaces too, like finding a smooth https://clownfishvoicechangerr.com/ experience where ease of access really matters. Thanks for sharing such a practical and inspiring tip!
This DIY 3D clouds idea is so creative and surprisingly simple to follow. I appreciate how you broke down the process—it makes the project feel approachable even for beginners. I’ve been exploring hands-on projects lately, and while reading this, I also came across https://fluxusexecutorpc.com/
, which inspired some creative themes for my workspace decor. Thanks for sharing such a fun guide!
Really enjoyed this DIY 3D clouds idea—especially the little “cheat,” which makes the whole process much more approachable for beginners. It’s a great reminder that simple shortcuts can save time without hurting creativity. I’ve seen the same principle apply in other spaces too, like finding a smooth https://getlolskin.com/experience where ease of access really matters. Thanks for sharing such a practical and inspiring tip!
Really enjoyed this DIY 3D clouds idea—especially the little “cheat,” which makes the whole process much more approachable for beginners. It’s a great reminder that simple shortcuts can save time without hurting creativity. I’ve seen the same principle apply in other spaces too, like finding a smooth https://getlolskin.com/ experience where ease of access really matters. Thanks for sharing such a practical and inspiring tip!
What a lovely and detailed DIY project! The 3D paper clouds are absolutely charming, and I really appreciate how honestly you shared the behind-the-scenes process as well. It makes the tutorial feel very real and encouraging, especially for teachers and parents who want creative yet manageable art ideas for kids. Both the symmetrical and asymmetrical cloud techniques are explained so clearly that even beginners could confidently try them.
Creative projects like this remind me how important clear, step-by-step guidance is—whether it’s for arts and crafts or essential digital services. In the same way you’ve broken down this DIY so beautifully, platforms like https://myaadhaaruidaii.net/ help users understand important Aadhaar-related processes in a simple and user-friendly way. Thanks for sharing such an inspiring and honest post—looking forward to seeing the next part of the project!
This DIY project is such a great example of how creative ideas become much easier to follow when they are explained step by step. Clear instructions really make a difference, especially for people trying something new at home.
The same approach is important in other areas too, like online informational guides. For example, platforms such as https://myaadhaaruiidai.com
focus on simplifying complex processes by breaking them into clear, easy-to-understand steps and guiding users toward official sources when needed.
Whether it’s DIY decor or digital services, clarity and simplicity always help users feel more confident.
Pelota libre permite disfrutar fútbol sin estrés, pelota libre tv mantiene buen acceso, y pelotalibre es sencilla.
Disfruta fútbol hoy en directo con Pelota Libre. Pelota Libre TV transmite encuentros deportivos y futbol libre PE facilita el acceso rápido y seguro.
This DIY project is such a great example of how creative ideas become much easier to follow when they are explained step by step. Clear instructions really make a difference, especially for people trying something new at home.
The same approach is important in other areas too, like online informational guides. For example, platforms such as https://uidaimyaadhaarcard.com/
focus on simplifying complex processes by breaking them into clear, easy-to-understand steps and guiding users toward official sources when needed.
Whether it’s DIY decor or digital services, clarity and simplicity always help users feel more confident.
The rise of blockchain technology has contributed to the success of BC GAME in the online gaming industry. Many users are drawn to its transparency and modern features. If you plan to explore BC GAME, always prioritize account security and responsible gaming to maintain a safe digital environment.
Level up, win big, and dominate in PK11 Game
It allows users to watch live sports matches without a subscription. The app is totally free to use, and you can stream matches without paying any additional charges. All the features that are present in it are available for free. Many other sports streaming apps require a monthly subscription to watch matches.
https://the-sportzfy.com/
Go ahead and put the APK on your Android netmirror.com.
Here is the NetMirror App Download, which you may launch from your device. At startup, this app should have a Netflix look and feel
There is a large selection of movies, TV shows, documentaries and more. We also have a search feature which allows you to find what you are looking for within our many categories.
Content is featured in the style of Netflix with genres, trending shows, and popular movies. https://netmirrorr.com.pk
As a pensioner from Rajasthan, I am very thankful for the RAJSSP portal. It has made it easy for me to check my pension status and payment details from home. Earlier, I had to visit offices many times, but now everything is available online, which is very helpful for senior citizens like me.
This DIY 3D cloud idea is really creative—especially the clever “shortcut” you mentioned, which makes the process feel much more approachable for beginners. I like how it balances aesthetics with practicality. It actually reminded me of how small tweaks or tools (like resources on https://windowstan.com/ ) can simplify creative or technical projects without compromising results. Great inspiration overall!
Such a creative approach to DIY 3D clouds—really love how you balanced aesthetics with a bit of practical “shortcutting” to make the process easier. It’s a great reminder that DIY doesn’t always have to be perfect to look amazing. I recently came across some helpful design tools on https://3patti-super.pk/ that complement projects like this, especially when experimenting with visual concepts.
Such a creative DIY idea! The 3D clouds look absolutely https://bhoomirtci.com/ dreamy and add a magical touch to any space.
I love how simple materials can turn into something so aesthetic. The “Mogelei” trick
parivahan
makes it even more fun and achievable!
This is perfect for room decor inspiration. The soft cloud effect
vehicle status check really creates a cozy and calming vibe.
Great tutorial! The step-by-step approach makes it easy
package tracking for beginners to try without feeling overwhelmed.
These 3D clouds would look amazing for events or
check passbook photoshoots too. Really unique and eye-catching idea! ☁️✨
Interesting take on DIY 3D Wolken and the illusion “trick” behind it—simple visual projects like this really show how small techniques can create a strong 3D effect. I’ve also come across some useful design and creativity resources on windowstan that align well with this kind of hands-on visual experimentation.
Really enjoyed this take on creating 3D clouds—it’s a simple idea but the visual impact is great, especially for DIY decor or creative projects. I’ve been exploring similar digital and visual concepts lately, and it’s interesting how different niches overlap in unexpected ways. Came across something related while browsing, like 3 patti super apk, which also shows how design and user experience play a big role in engagement. Thanks for sharing this creative approach!
Restore Old Photos is a professional service that brings your precious memories back to life with advanced photo restoration technology
Brat Generator Online makes it easy to create brat-style text visuals instantly.
Ai Photo Enhancer enhances images by increasing clarity, sharpness, and details.
Concrete Calculator helps contractors and DIY builders reduce waste and plan projects with precise material estimates.
AI Image Editor is a powerful AI image editor for restoring and enhancing images.
HEIC to JPG offers a simple, fast, and free way to convert your HEIC files to high-quality JPG images online.
Image to Image AI offers fast, high-quality image transformation, making it perfect for creators, designers, and everyday users who need instant visual upgrades.
This online square face generator is the best Picrew alternative in English — create adorable square face icons for social media and game development
Qnut e-bikes are built for practical, everyday use, combining electric assistance with a comfortable ride that works well for commuting, errands, and leisure trips. A Qnut Coupon Code can help lower the overall cost, making it easier to afford a quality e-bike.
Users desire to be able to make their videos appear clean when they export. This feature helps remove unwanted marks from the final video. It makes content look neater and ready to share. However, this may depend on the version you install. Users often prefer this clean export option. It helps videos look more professional without extra effort. This is useful for social media posts and short clips.
Thank you for this excellent blog post—it was very helpful and informative. I’m really glad I found it, as it offered exactly the insights I was looking for. Your posts consistently bring something new to learn, and I truly appreciate the effort you put into sharing such valuable information. Each visit to your blog gives me fresh ideas and useful knowledge I can put into practice. Keep up the great work, and thanks again for providing such thoughtful and useful content to your readers.
Die Wolken sehen echt super süß aus ☁️😊 Besonders cool finde ich, dass du auch die kleinen „Behind the Scenes“-Momente zeigst — macht den Beitrag viel authentischer. Solche kreativen DIY-Projekte machen richtig Spaß und sind ein guter Ausgleich zum Alltag. Ich beschäftige mich sonst eher mit Fitness und vergleiche manchmal Trainingsleistungen über https://dotscalculator.com/, deshalb finde ich kreative Hobbys als Balance umso wichtiger 😄
CarX Street Mod APK features give players a complete open-world street racing experience with realistic drifting physics, smooth graphics, and fast-paced highway racing. The mod version usually includes unlimited money, unlimited gold, all cars unlocked, free premium upgrades, advanced tuning and customization options, ad-free gameplay, offline mode support, unlocked missions, high FPS performance, and realistic day-and-night city environments for a more immersive racing experience. Visit https://carxstreetmodapkz.com/ for more details.
Thank you for sharing this amazing content. I really enjoyed reading your post and found it both helpful and inspiring. It’s wonderful to see such well-presented ideas and useful information shared with others. Your dedication truly shows in your work. Keep creating and sharing more great content in the future.
The HIKEEP promo code “RICHARDSTEPHENS” offers 2% OFF all HIKEEP eBike models when applied at checkout. It’s a simple way to save a small amount on electric bikes designed for commuting, recreation, and everyday riding.
From compact city eBikes to more powerful long-range models, HIKEEP provides options for different riding styles and needs. Enter the “RICHARDSTEPHENS” promo code before completing your purchase to unlock the discount.
Finding high-quality entertainment online becomes easier with XXFlame, a platform known for offering some of the Best Porn Videos with smooth streaming and updated collections. XXFlame focuses on delivering clear video quality, fast loading speed, and a wide variety of trending categories for viewers who enjoy premium-style adult entertainment.
Interesting read: „DIY 3D Wolken + die Mogelei – Love Decorations“. Thanks for sharing this!
experience a dark, thrilling twist on popular survival drama tropes infused with heavy doses of explicit adult themes. this wild squid game sex parody forces characters into high-stakes playground challenges where the punishments and the rewards are completely unrated. see if you can survive the ultimate tests of endurance and absolute pleasure.
XXFlame Adult Dating Site is designed for adults who want to explore new connections in a secure and user-friendly online environment. Whether you are looking for casual conversations, exciting friendships, or meaningful relationships, XXFlame offers a platform that helps like-minded people connect with confidence.
I recently stopped by Lumin Lash for Eyelash Extensions Richmond services, and honestly it was pretty amazing from beginning to end. The beauty artists were professional but also friendly, and they seemed fully in tune with what I wanted. They worked really hard to make natural-looking lashes that felt comfortable, like they actually belonged to my own eyes, not just pasted on. It matched my personal style too, which I did not expect them to get so right on the first try. The salon itself was clean , calm, and kind of luxurious in a way that made the whole appointment feel slower, softer , and not stressful. I was already searching around for trusted eyelash extensions Richmond experts, and Lumin Lash went beyond what I had hoped. Their precision was on point and the lash products looked high quality. Plus the beauty care felt personalized, not generic or rushed. Now my lashes look fuller, more elegant , and still lightweight. They even feel natural and easy to manage each day, which is honestly the main thing I care about. I would recommend Lumin Lash to anyone wanting a real lash transformation, a confidence boost, and a professional beauty studio that actually cares about customer satisfaction and long-lasting results, not just quick work and out the door.
Hallo Rosy,
tolle Idee mit den 3D-Wolken! Ich liebe es, wie du sowohl symmetrische als auch unsymmetrische Varianten zeigst – das macht die Anleitung so vielseitig. Den Druck, stets perfekte Kreationen abliefern zu müssen, kann ich gut nachvollziehen. Dein ehrlicher Blick hinter die Kulissen macht den Blog besonders sympathisch!
Die Wolken passen sicher wunderbar als
Official RoboLibrary Homepage
Excellent insights on wedding entertainment! Finding the right St Louis wedding DJ is essential for creating a memorable celebration. JC En-Motion stands out by providing professional DJ services, customized playlists, and engaging entertainment tailored to each couple’s vision. A skilled DJ can truly elevate the atmosphere and keep guests entertained all night long.
Great information on Tirzepatide 60mg Vial. This compound continues to generate interest in research focused on metabolic pathways and related scientific studies. GreyWonderland offers access to research products and educational resources that help researchers stay informed. Thanks for sharing valuable insights on this important area of ongoing investigation.
Hallo Rosy,
was für eine wundervolle Ide
Tomodachi Life Food Tracker
Die Wolken sind wirklich super geworden! ☁️😊 Besonders schön finde ich, dass du nicht nur die Anleitung zeigst, sondern auch die kleinen Einblicke hinter die Kulissen. Oft sieht man auf Blogs nur das perfekte Endergebnis, dabei gehören kreative Lösungen und kleine Improvisationen einfach dazu. Die Technik wirkt erstaunlich einfach und das Ergebnis macht richtig was her. Ich kann mir die Wolken auch gut als Mobile oder als Deko im Kinderzimmer vorstellen.
Really cool! You’ve made some strong, thoughtful points.
Toll, dass du wieder da bist und direkt so eine kreative Idee für den Kunstunterricht teilst! Die 3D-Wolken aus Tonpapier sehen wirklich bezaubernd aus – sowohl die symmetrische als auch die unsymmetrische Variante haben ihren eigenen Charme. Ich finde es ehrlich und sympathisch, wie du den Druck beschreibst, den man als Kreativ-Bloggerin manchmal spürt, aber deine Begeisterung für solche Projekte überträgt sich definitiv auf die Leser. Der Hinweis auf die „Mogelei“ hinter den Kulissen hat mich zum Schmunzeln gebracht, denn genau das macht deinen Blog so authentisch. Wer sich übrigens für eine andere Art von Detailarbeit interessiert, findet vielleicht auch beim Thema gothic remake lockpicking spannende Einblicke. Ich bin schon gespannt auf den zweiten Teil des Kunstwerks und wünsche dir einen guten Start ins Schuljahr!
https://www.asphaltcalculatorprice.com
This website provides a practical asphalt calculator for estimating volume, weight, and cost for paving projects. It is useful for driveways, roads, parking lots, and other construction jobs where accurate asphalt planning matters. Users can quickly calculate material needs and better control project budgets.
https://www.przelicznik-foremek.pl
To praktyczny przelicznik foremek, który pomaga w kuchni i przy pieczeniu. Użytkownicy mogą szybko dopasować proporcje składników do różnych rozmiarów form. Strona jest szczególnie przydatna dla osób piekących w domu oraz dla kulinarnych pasjonatów.
https://www.asphaltcalculatorprice.com
This website provides a practical asphalt calculator for estimating volume, weight, and cost for paving projects. It is useful for driveways, roads, parking lots, and other construction jobs where accurate asphalt planning matters. Users can quickly calculate material needs and better control project budgets.